
How to Make an Automatic Chicken Waterer
You have embarked on a quest to discover the secrets of creating an extraordinary contraption known as the automatic chicken waterer.
This ingenious invention will revolutionize the way your feathered friends hydrate, providing them with a self-watering system that will make their lives easier and your chores simpler.
In this article, we will guide you through the steps needed to construct this marvel, ensuring that your chickens will never go thirsty again. So grab your tools and let your creativity flow as we embark on this exciting journey together.
This image is property of images.squarespace-cdn.com.
How to Make an Automatic Chicken Waterer
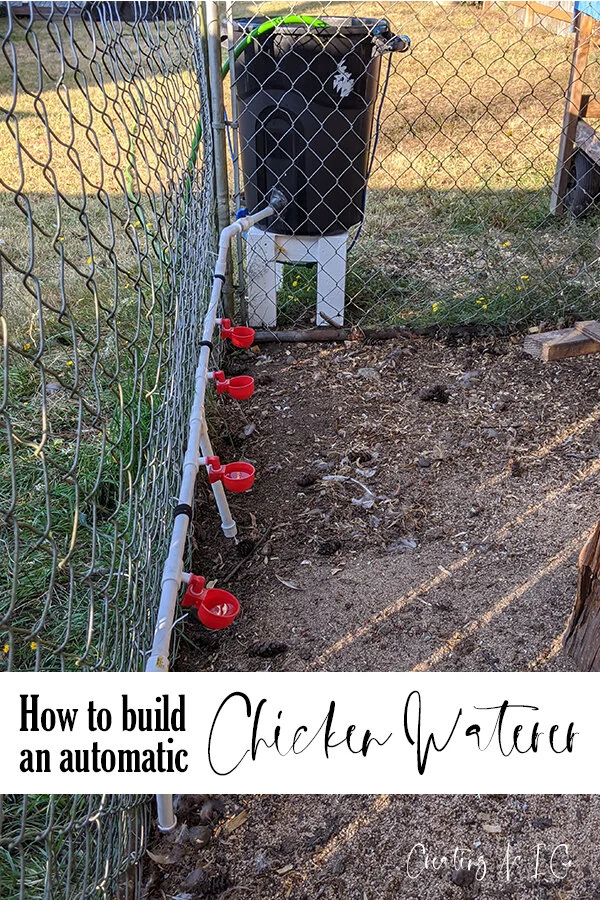
Keeping your chickens hydrated is essential for their health and well-being, but constantly refilling their water containers can be time-consuming and inefficient. That's where an automatic chicken waterer comes in handy.
With just a few materials and some basic tools, you can create a self-watering system that will provide your flock with a constant supply of fresh water. In this article, we will guide you through the step-by-step process of building your own automatic chicken waterer.
Materials and Tools
Before we dive into the instructions, let's gather all the materials and tools you'll need for this project.
Here's a checklist to ensure you have everything:
- 5-gallon bucket
- Chicken water nipples
- Drill
- Hose connector
- Teflon tape
- Zip ties
Having these materials ready will make the construction process smooth and efficient.
Step 1: Prepare the 5-gallon bucket
The first step in creating your automatic chicken waterer is to prepare the 5-gallon bucket.
Start by cleaning the bucket thoroughly to ensure there are no residues or contaminants.
Once the bucket is clean, make sure the lid is tightly sealed to prevent any water leaks.
Step 2: Drill holes for the water nipples
To allow your chickens to access the water, you'll need to drill holes in the bucket for the water nipples.
The number of nipples you'll need depends on the size of your flock. As a general rule of thumb, one nipple per four chickens should be sufficient.
Mark the spots on the bucket where you want to drill the holes, making sure they are evenly spaced. Use a drill bit of the appropriate size for your water nipples and carefully drill the holes.
Step 3: Attach the hose connector
Next, you'll need to attach the hose connector to the lid of the bucket. Choose a suitable spot on the lid and mark it for drilling.
Using a drill bit that matches the size of your hose connector, carefully drill a hole in the lid at the marked spot. Once the hole is drilled, insert the hose connector and ensure it fits securely.
Step 4: Apply Teflon tape to the connectors
To prevent any water leakage, it's important to apply Teflon tape to the connectors.
Start by wrapping the Teflon tape around the threads of the connectors. This will create a tight seal when the connectors are screwed into place, ensuring that no water escapes.
Step 5: Secure the water nipples
Now it's time to secure the water nipples in the drilled holes. Insert each water nipple into its respective holes, making sure they fit snugly.
Once in place, use pliers to tighten the nipples, ensuring that they are secure and won't come loose. This will prevent any accidental spills or leaks.
Step 6: Fill the bucket with water
With all the components in place, it's time to fill the bucket with water. Ensure that the lid is tightly sealed to prevent any water from escaping. Fill the bucket with clean water, making sure it reaches the desired level.
The water will flow through the nipples and be accessible to your chickens whenever they need a drink.
Troubleshooting Tips
While creating your automatic chicken waterer, you may encounter a few challenges.
Here are some troubleshooting tips to help address common issues:
1. Water leakage
If you notice any water leakage around the connectors or water nipples, double-check that the Teflon tape is properly applied. Make sure all the connections are tight and secure. If the problem persists, you may need to replace the connectors or water nipples.
2. Nipples not working properly
If the water nipples are not functioning as expected, check that they are properly tightened in the drilled holes.
They should be snug and not wobbly. Additionally, ensure there is enough water pressure for the nipples to release water. If the issue persists, consider replacing the nipples with new ones.
3. Bucket not filling properly
If the bucket does not fill properly, check that the lid is tightly sealed. Any gaps or loose fittings can affect the water flow. Additionally, verify that the hose connector is securely attached to the lid and there are no blockages in the system.
Following these troubleshooting tips should help you resolve any issues you encounter while setting up your automatic chicken waterer.
With your homemade automatic chicken waterer in place, you can rest assured that your flock will have a constant supply of clean water.
This efficient system will save you time and effort, allowing you to focus on other aspects of caring for your chickens. Give it a try and see how it simplifies your chicken watering routine!